Friday, September 16, 2011

Sweet Home Alabanana (Bread)

I had three ripe bananas today and wanted to try something new, so I looked up banana bread in my "Eat, Shrink and Be Merry" cookbook by the Podleski sisters. My husband had mentioned that they made a good looking banana bread on their show the other night.

I went to page 160 and gave it a try. The recipe makes two small loaves. They said to cut into 8, but I cut mine into 12. Looked good to me.


I really enjoyed the loaf, and so did my ladies group this morning, and my parents, who surprised me with a lunch-time visit, and I think my husband and children were left looking for more. I do wish I had mini chocolate chips, however, since there were fewer chips when you use regular ones and each bite didn't necessarily get a chip. I also added raisins - I could easily have added more! All in all, very good banana bread.

Friday, September 9, 2011

Zucchini Muffins

When you have a big, lovely zucchini staring you in the face and you don't know what to do with it, make muffins! These are sweet, moist muffins that go over well with the family. I pictured them yesterday among my back to school baking items.


1 Dozen Zucchini Muffins
1 1/3 cups finely grated zucchini (peel and all)
1/3 cup vegetable oil
1/3 cup applesauce
2/3 cup sugar
2 eggs
1 tsp vanilla

1 cup white flour
2/3 cup whole wheat flour
2 tsp cinnamon
1/2 tsp salt (or less)
1 tsp baking powder
1 tsp baking soda
1/3 cup chocolate chips or nuts or raisins (optional)

Combine the first 6 wet ingredients. In another bowl, combine the dry ingredients. Mix the dry ingredients in with the wet. Stir together just until combined. Scoop into greased or papered muffin tins.

Bake at 375 degrees for 18-20 minutes. They should spring back up when touched lightly on top.

Thursday, September 8, 2011

Welcome Back to School Supper!

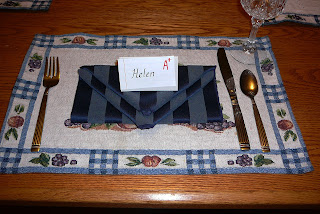
My children and husband went back to school and teaching this week, so I made a supper for our family and a neighbor family to "Welcome Back School"! For fun, my preschooler and I designed some place setting cards using cardstock, looseleaf and broad black and red markers. I set the table with an apple as the centrepiece.
Everyone was pleased they each got an A+. The menu was as follows:

Back to School Supper Menu
Crudites, crackers and cheese
Red Wine
Milk

Sweet and Sour Meatballs on a bed of Rice
Green Beans
Fresh Green Salad
Rolls

Coffee and Tea

The Meatballs were from a recipe my mother gave me:

Meatballs
1 pound ground beef
1 egg
1/2 cup bread crumbs
2 Tbsp minced onion
1/2 tsp salt
1/2 tsp Worchestershire sauce
1/8 tsp pepper

1. Preheat oven to 400 degrees F.
2. Combine all ingredients.
3. Form into 36 meatballs. (I like to press the mixture directly onto my baking sheet, 1 inch thick, and about 6 x 6 inches square. Then I use a knife and cut the mixture into half, then each half into thirds and using the length of a long knife, slide the columns of meat apart far enough to separate. Then turn the pan 1/4 turn and cut each log into 6 meatballs. Yes, they're square, but trust me, nobody will notice or care!)
4. Bake 5 minutes in preheated oven.
5. Flip each meatball over and Bake 5 minutes more.
6. Now you can bake them a little longer in the oven, or transfer them to a simmering pan of your favorite sauce.

Sweet and Sour Sauce
1/2 cup pineapple syrup (or apple juice)
1/2 cup brown sugar
1/4 cup ketchup
can of pineapple chunks (optional)

Whisk together all ingredients and heat until simmering.

This is what my "Back to School Baking" looked like yesterday:

I made two batches of bread, a lemon meringue pie, an apple pie and zucchini muffins (I'll talk about them tomorrow).  The rolls were still in the oven at this point. The rolls were made using the recipe in my bread book - Celery Seed Rolls/Buns on page 509. I had made them once in the past, where I said they made yummy buns. I wanted dinner rolls to go with the meal, so I tried them again. This time, I did not put any celery seeds on them. They needed an extra hour to ferment beyond the normal two risings, so they were not quick to make, but they did turn out very nicely and were just right for a dinner roll - light and fluffy and good to sop up a bit of sweet and sour sauce! The recipe says they make two dozen rolls or 12 buns, but I formed them into 32 small rolls. (16 in each 9 x 9" pan). That way, they baked into each other and had to be pulled apart, leaving nice, soft sides.

To finish off the meal, I presented my "A+ Apple Pie" to all the students and teachers around my table and everyone enjoyed a piece!

Happy Back to School everyone!

Saturday, September 3, 2011

Hockey Jersey Cake

For all you hockey lovers out there, this is a cake for you! I made it for my Canadiens-lover, who turned eight.

It was easier than I thought it would be. I cut a 9x13" cake into pieces. (Well, actually I did that twice, to make a 2 layer cake.)


The body of the shirt is a rectangle roughly 8x9" and the sleeves are what's left over, cut diagonally through the middle and attached to the sides of the shirt. I angled the top of the shirt to be the shoulders and used a small scrap cut off when I levelled the cake to make the neckline. I stuck it all together and crumb coated it with chocolate fudge icing.  Then I covered it in a single large piece of red fondant. I used my ribbon cutter to cut stripes in blue and white and laid them on.

I figured out this technique of rolling the stripes onto my rolling pin, which allowed me to lay them out on the shirt without them stretching like crazy. The rolling pin really helped the process go smoothly.
I used a knife to cut the number and letters. I even "stitched" some of the seams for the shirt with a small knife. It was lots of fun to make!

I had Adam's actual hockey jersey to go by. I was surprised how similar in size the cake turned out. My husband wants the same cake for his birthday!